Wednesday 17 December 2008

Alien Mask

I am afraid that I did not have a camera at hand while I was rushing to finish my costume for Halloween so many stages of its development have been left out. It is still unfinished in the images below. I hope to finish it soon and too build a new mask and fill in the blanks in its construction.
Here is the mask as it is at the time of writing.After finishing it I have begun testing a new base layer to give it a glossier finish. Before doing this some alterations and additions need to be added to the Alien helmet.Here is the right hand side (as you can see) which still has the full black coat that I applied on Halloween. It is obvious that it needs a better paint job, the one at present was applied on Halloween using one coat from an airbrush. If you look closely you can even see the news print on the paper-ma-Che underneath the paint. You can also see that the very back of the head needs rounding off just a little more. You may have also noticed that it is missing a few teeth (I began t o remove them after Halloween in preparation for the alterations to come.The new layers of paint should help smooth out the surface as it is a bit rough at present. I hope these shots also help to illuminate some of the dark spots in the tutorial I have given. The void at the base of the mask shows where I have extended it beyond the initial framework.

Friday 12 December 2008

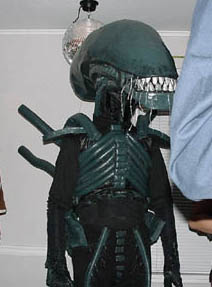
Alien Costume

Found this costume. Thought I would share it.

Alien Mask Creation.... Again

The Next Step...
Well I rebuilt the arch of the head after making some alterations to make the helmet fit a little better.As you can see I had just begun applying my paper ma Che. Here it is completely covered with the base layer, made from strips of news paper.Here I am cutting cardboard into circles and gluing them together, later I cut these down to size and attach them to the side of the head to create the tubing.

Thursday 11 December 2008

Alien Head Construction, Continued

I left off after cutting out the Jaw. The next step was to attach it to the frame of the Alien head.It was also necessary to affix a base to the bottom of the jaw to give it the right structure and as a base for fleshing it out later on.
Here is another image of the profile of the head with the first (prototype jaw) attached.
From this point I wanted to rebuild the Ring that holds the frame on top of my head. I built a carboard frame and then encased it in paper-ma-she. The first attempt at this didn't work as it turned out to thick and made the head absurdly wide.

Latice Work, supports my head.Framework Bulked out. Strong enough to resist the pressure of the helmet squeezing in and to protect my head while im wearing it.
Paper-ma-che around it to give it extra strength (this version was to wide).
From this point I made some tests in order to try and make some translucent teeth for the finished mask. I ended up using a hot glue gun, sticking two sheets of plastic together in order to make each tooth. The plastic was cut from empty coke bottles.
I also intend to use translucent plastic (and lots & lots of glue) to make the gums and tissue around the Aliens mouth. Here are some of my sketches and designs for this section alone.

Tuesday 9 December 2008

Silent Hill Musical

Just found this, made me smile. Silent hill cast, "Bright side of Life".

Home made Appliances

Here is a quick link to a video I found on you tube. It shows clearly how to make your own silicone face mask.

Sunday 16 November 2008

Awesome Clock

Hey, just found this relay cool cook coo clock, Would love to see it in motion.

Monday 13 October 2008

Making My Haloween Costume

I have stated that this year I intend to go out in fancy dress as the "Alien" creature. I would also like this costume to be home made.

So... to get started I have been looking around for some good reference images to help me design and build my costume. Here are some of them...
I began by sketching out the shape of the creatures head onto cardboard (it took
a couple of sheets glued together).
The next step is to glue the ends together and create the base shape of the creatures head.I made a card bangle to fit around my own head. As you can see I glued this inside the frame for my aliens head.The next step has been to test out the visor on the front of the mask, For this I cut out a clear plastic, 2 liter bottle and pinned it to the cardboard, It fit and took the right shape without having to make any alterations, great success!For the next step I have drawn out the shape for the jaw and cut it out of cardboard. Here is the basic shape that I will build upon.Well that's enough on the construction for now.

Here is a page with an interesting take on some classic designs, a little too erotica for my tastes but still very interesting.

Tuesday 7 October 2008

Costume for Haloween 08

Just a quick first few posts as its almost time for me to turn in for the night. I would like to declare that I am working on two costumes for this Halloween and as their are only 24 days left I am running out of time to get them both completed. The 1st is a Satire/Fawn costume of my own design and the second is the creature from the film Alien.
I have been working on them for a couple of days now. This is how the alien head is shaping up. I intend to show a great deal of my work in progress and share my construction methods with anyone who is interested. I intend to use materials that are cheap, easy to obtain and build with.

Trickle Treat

A blog dedicated to my enthusiasm for fancy dress and to the traditions of this fantastic day.